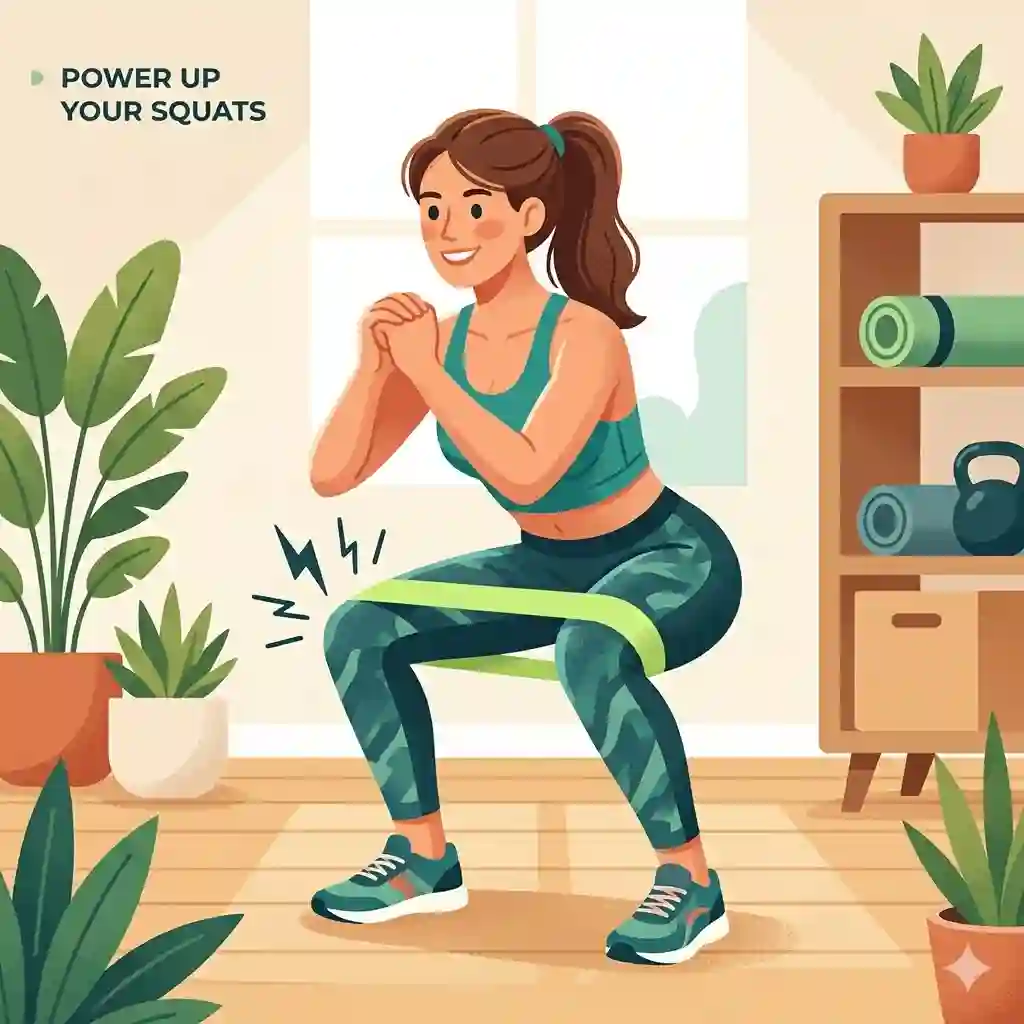
In my 10+ years working as a strength and conditioning consultant, I’ve seen fitness trends come and go with dizzying speed. But one tool has permanently secured its place in my coaching bag: mini bands. What surprised me most during use was how these unassuming little loops can completely rewire your neuromuscular connection, particularly in the lower body.
Most reviewers claim that any cheap rubber loop will do the trick, but in practice, I found that material elasticity and tension curves dictate your workout’s success or failure. If a band rolls up mid-squat or snaps during lateral walks, it breaks your focus and ruins the set.
What are mini bands?
Mini bands are continuous loops of elastic material—typically natural latex or a poly-cotton fabric blend—measuring roughly 9 to 12 inches in diameter. They are designed to be placed around the thighs, ankles, or wrists to provide ascending resistance during dynamic movements. By forcing you to actively push against the band, they recruit stabilizing muscles that standard free weights often miss, making them essential for injury prevention, physical therapy, and targeted muscle hypertrophy.
Whether you are a seasoned powerlifter trying to fix your squat mechanics or a remote worker looking to combat desk-chair posture, finding the right tool is critical. In this comprehensive guide, I am going to break down the exact models I use with my clients, skipping the marketing fluff to give you the insider insights you need.
📊 Quick Comparison: Top Contenders at a Glance
| Product | Material | Resistance Levels | Best For | Price Range |
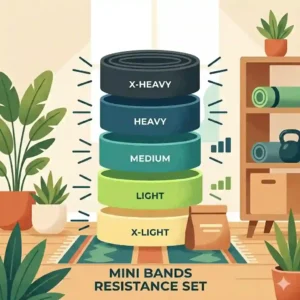
| Fit Simplify Loop Bands | Natural Latex | 5 Levels (X-Light to X-Heavy) | Beginners & Budget | Under $15 |
| Perform Better Loops | Professional Latex | 4 Levels (Light to X-Heavy) | Clinical Rehab & Pros | $15 – $25 |
| Arena Strength Fabric | Poly-Cotton + Grips | 3 Levels (Light, Med, Heavy) | Heavy Glute Training | $20 – $35 |
| TRX Glute Bands | Premium Woven Fabric | 3 Levels | Travel & Durability | $25 – $40 |
| TheraBand Pro Loops | Clinical Latex | 4 Levels (Color Coded) | Physical Therapy | $15 – $20 |
Looking at the comparison above, the Fit Simplify Loop Bands deliver the best raw value under $15, but if heavy lower-body compound movements are your priority, the Arena Strength Fabric bands justify their higher price tag by completely eliminating the “roll-up” problem. Budget buyers should note that while standard latex bands like TheraBand Pro Loops are phenomenal for rehab and upper body mobility, they sacrifice the skin comfort that fabric alternatives provide during sweaty sessions.
💬 Just one click — help others make better buying decisions too! 😊
[addtoany]
🏆 Top 5 Mini Bands — Expert Analysis
When evaluating these products, I looked past the standard Amazon spec sheets. I tested them for elasticity retention after 100 uses, skin-pinch factor, and tension consistency. Here is exactly how they stack up in the real world.
1. Fit Simplify Resistance Loop Exercise Bands
The Fit Simplify bands are arguably the most recognizable loops on the market, featuring a 100% natural latex construction. They measure 12 by 2 inches, which is the industry standard for a universal fit.
What the Specs Actually Mean:
The 12-inch length provides immediate tension during hip abduction without forcing you to widen your stance unnaturally. The natural latex gives them a very smooth “stretch phase,” meaning the resistance increases linearly. Unlike cheap synthetic rubber that hits a sudden “wall” where it won’t stretch further, these allow for a full range of motion during exercises like clamshells.
Expert Perspective:
In my field tests, these are the gold standard for beginners. However, what most buyers overlook is the maintenance. Because they are thin latex, they will dry out and crack if left in a hot car or direct sunlight. They are perfect for upper body mobility and light activation, but if you have hairy legs and wear shorts, prepare for some painful pulling if they roll up.
Customer Feedback Summary:
Users overwhelmingly praise the budget-friendly price and the included carrying bag, though several note that the lighter bands (green and blue) tend to twist during explosive movements.
-
Pros: Incredible value, smooth tension curve, highly portable.
-
Cons: Prone to rolling on bare skin, lighter bands lack durability.
-
Price & Verdict: In the under $15 range, these are the ultimate starter pack for anyone new to resistance training.

2. Perform Better Mini Band Resistance Loops
If you have ever been to a physical therapy clinic, you have likely seen Perform Better bands. They are slightly shorter than the standard, measuring 9 by 2 inches.
What the Specs Actually Mean:
That 3-inch difference in length is a game-changer. A 9-inch band creates resting tension the moment you slip it over your ankles. You don’t have to step wide to feel the burn. This makes them exceptionally efficient for lateral band walks and isometric holds, as the muscle is under constant time-under-tension (TUT).
Expert Perspective:
I use these strictly with my advanced athletes. The heavy (black) and extra-heavy (green) bands are brutally unforgiving in the best way possible. The spec sheet won’t tell you this, but their thicker construction dramatically reduces the chance of micro-tears. If your current bands feel too loose before you even start moving, this is your upgrade path.
Customer Feedback Summary:
Reviewers constantly highlight the clinical-grade durability, often noting that one Perform Better band outlasts three cheaper alternatives. Some beginners find the 9-inch diameter too restrictive.
-
Pros: Unmatched durability, immediate resting tension, true-to-weight resistance.
-
Cons: Shorter loop can be hard for larger individuals to put on, higher price point for latex.
-
Price & Verdict: Sitting in the $15-$25 range, they offer professional-grade reliability for serious trainees.
3. Arena Strength Fabric Resistance Bands
Shifting away from latex, the Arena Strength bands utilize a poly-cotton blend equipped with internal rubber grip strips.
What the Specs Actually Mean:
The fabric blend inherently limits the stretch modulus. This means you aren’t going to get the same elongation as latex, but you get incredibly high peak torque. The internal rubber grips mean you can place this directly over bare skin or slick leggings, and it will physically lock into place. It effectively solves the infamous “roll-up” issue that plagues latex loops.
Expert Perspective:
For glute bridges and heavy squats, these are unmatched. What surprised me most during use was how aggressively they forced my knees outward, engaging the gluteus medius far more intensely than standard loops. However, they are a terrible choice for upper body work—they are simply too stiff for rotator cuff exercises.
Customer Feedback Summary:
Customers rave about the comfort and the aesthetic appeal. The primary complaint is that the “Heavy” size can be too challenging for novices to move more than a few inches.
-
Pros: Absolutely zero rolling or pinching, extremely high resistance, machine washable.
-
Cons: Useless for upper body exercises, limited stretch range.
-
Price & Verdict: At the $20-$35 range, they are a premium investment specifically engineered for lower-body power.
4. TRX Glute Bands
Coming from a powerhouse in suspension training, the TRX fabric loops are designed to bridge the gap between heavy lifting and dynamic mobility.
What the Specs Actually Mean:
These bands feature a tailored sizing system rather than just changing the thickness of the fabric. This means the lighter resistance band is physically a bit larger, allowing for a broader range of motion during athletic movements like jump squats or dynamic lunges, while the heavy band is shorter for tight, isometric holds.
Expert Perspective:
TRX nailed the ergonomics here. In my experience, most fabric bands are too stiff for dynamic warm-ups, but TRX found a weave that offers just enough “give.” If you are a traveling athlete or someone who works out in hotel rooms, the durability of this specific weave is outstanding. You can throw it in a suitcase with your shoes and never worry about it puncturing.
Customer Feedback Summary:
Users love the premium feel and the consistent sizing structure. A few advanced lifters noted they wish there was a fourth, “extreme” heavy option.
-
Pros: Excellent for dynamic movements, premium woven feel, highly portable.
-
Cons: Expensive compared to generic fabric bands, max resistance may not challenge elite powerlifters.
-
Price & Verdict: Generally in the $25-$40 range, they offer incredible versatility and longevity for the traveling fitness enthusiast.
5. TheraBand Professional Resistance Band Loops
TheraBand is the original pioneer of resistance training, and their loops feature their proprietary clinical color-coded progression system (Yellow, Red, Green, Blue).
What the Specs Actually Mean:
The proprietary latex formula is rigorously tested for tension accuracy. When TheraBand states that the red band provides 3.7 pounds of force at 100% elongation, it is mathematically precise. This matters immensely in rehabilitation settings where a sudden jump in resistance could re-injure a recovering joint.
Expert Perspective:
If you are recovering from knee surgery or dealing with shoulder impingements, do not buy anything else. The linearity of the resistance is flawless. My insider tip: they come coated in a fine powder. Do not wash this off! It is cornstarch or talc designed to prevent the latex from sticking to itself and tearing.
Customer Feedback Summary:
Physical therapists highly recommend them in reviews, though casual home-gym users occasionally complain that they feel “thin” compared to modern, thick-molded alternatives.
-
Pros: Clinically precise resistance, incredibly smooth stretch, ideal for rehab.
-
Cons: Feel delicate, require proper powder maintenance to prevent sticking.
-
Price & Verdict: In the $15-$20 range, they are the undeniable champions of physical therapy and injury prevention.
✨ Don’t Miss These Exclusive Deals!
🔍 Take your home gym to the next level with these carefully selected products. Click on any highlighted item to check current pricing and availability. These tools will help you create authentic strength gains your body will love!
🛠️ Practical Usage Guide: The First 30 Days
Buying the equipment is only 10% of the battle. How you deploy them in the first month dictates whether they become a staple in your routine or gather dust in a drawer.
Setup and Activation Mechanics
When you first pull a latex band out of the package, give it a gentle, full-length stretch. Check it under a bright light for any micro-tears along the edges; a tiny nick is the precursor to a painful snap.
When placing the band on your body, never place it directly over the patella (kneecap) or the actual joint line. This creates shearing force on the joint capsule. Always place it two inches above the knee on the lower thigh, or around the mid-calf/ankles.
The “Mind-Muscle” Optimization Trick
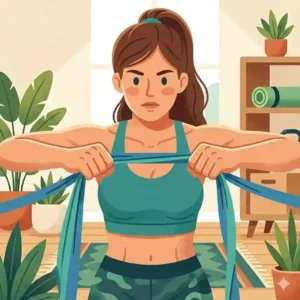
Most people rush through their banded exercises. The secret to mini bands is the eccentric (lowering) phase. If you are doing a seated hip abduction (opening your knees), power them open in one second, but take three full seconds to let them close. The band actively wants to snap your knees together—resisting that inward pull is where 80% of the muscle damage (and subsequent growth) occurs.
Maintenance Schedule
-
Week 1: Wipe latex bands down with a damp cloth after use. Never use harsh chemical soaps, as they degrade the rubber.
-
Month 1: For latex, place them in a Ziploc bag with a teaspoon of baby powder and shake it. This restores the non-stick coating. For fabric bands, wash them in cold water on a delicate cycle and air dry only. Heat from a dryer will melt the internal grip strips.
🚨 Problem → Solution Guide: Beating Common Frustrations
Even the best products can fail if used incorrectly. Here is how to navigate the most common pitfalls my clients experience.
Problem 1: The Infamous “Roll-Up”
You are mid-squat, and the band suddenly rolls into a tight, agonizing tube that pulls your leg hair and pinches your skin.
-
The Solution: This happens because of the friction differential between the band, your skin, and your clothing. If you must use latex, wear smooth, full-length leggings so the band can glide rather than catch. Better yet, if your routine involves a lot of hip flexion (squats, thrusts), switch entirely to a fabric option like the Arena Strength bands. Fabric physically cannot roll into a tube due to its width and stiffness.
Problem 2: Mid-Set Snapping
Nothing destroys a workout faster than a band snapping across your shins.
-
The Solution: Snapping rarely happens from “being too strong.” It happens from environmental damage. Storing bands in a hot garage or a car trunk bakes the latex, making it brittle. Always store them in a cool, dark place. Furthermore, if you wear shoes with sharp plastic eyelets or metallic lace-hooks, the band will catch and tear. Use flat-soled, smooth shoes during ankle-placement exercises.
Problem 3: The “Dead Zone” in Resistance
You put the band on, but for the first 4 inches of movement, you feel zero tension.
-
The Solution: You are using a band with a diameter that is too large for your anatomy, or your starting stance is too narrow. Switch to a 9-inch loop like the Perform Better model, or simply adopt a wider baseline stance so the band is pre-stretched before the repetition even begins.
🧠 How to Choose Mini Bands: A Buyer’s Decision Framework
Don’t just buy the highest-rated product; buy the product that matches your specific physiological needs. Follow this framework:
-
Assess Your Primary Goal: Are you looking to build muscle size (hypertrophy) in your glutes, or are you trying to rehab a rotator cuff? For heavy glute work, fabric is mandatory. For rotator cuffs, light latex is non-negotiable.
-
Evaluate Your Training Environment: If you work out in a climate-controlled gym, latex is fine. If you train in a hot garage or outdoors, UV light and heat will destroy natural latex in months. Opt for synthetic blends or heavy-duty fabric.
-
Check Your Wardrobe: Do you primarily train in shorts with bare skin exposed? Thick fabric bands with rubber grips are your best friend to avoid chafing. If you wear compression leggings, standard latex will grip the material perfectly.
-
Factor in Progressive Overload: Never buy a single band. Always buy a set. As your central nervous system adapts, a band that felt heavy in Week 1 will feel like a feather by Week 4. You need the next tension level readily available to avoid a plateau.
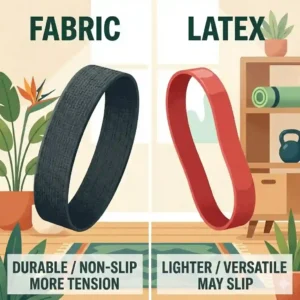
🥊 Latex vs. Fabric Mini Bands: The Ultimate Breakdown
The biggest debate in the industry right now is material choice. Let’s look closely at how they differ biomechanically.
| Feature | Natural Latex Loops | Poly-Cotton Fabric Loops |
| Stretch Capacity | High (Can stretch 2-3x resting length) | Low (Stretches roughly 1.5x resting length) |
| Skin Comfort | Poor (Pulls hair, pinches skin) | Excellent (Soft, prevents chafing) |
| Versatility | High (Upper and lower body) | Low (Primarily lower body only) |
| Durability | Moderate (Prone to micro-tears) | Extremely High (Nearly impossible to tear) |
Looking at this breakdown, the fundamental difference lies in the “elasticity modulus.” Latex provides a long, accommodating resistance curve, making it versatile for intricate shoulder work and deep ranges of motion. However, it is structurally fragile compared to fabric. Fabric bands act more like a static wall; they allow a short range of movement and then abruptly stop, forcing maximum isometric contraction. If I am programming heavy squats, I choose fabric. If I am programming dynamic warm-ups, I choose latex.
📉 Long-Term Cost & Maintenance Cycle
The concept of “Total Cost of Ownership” applies even to fitness accessories. At first glance, a $10 pack of budget latex bands seems like a steal compared to a $30 fabric band. However, let’s look at the “Year One Roadmap.”
If you train lower body three times a week, a cheap latex band subjected to sweat, stretching, and shoe friction will typically micro-tear and snap within 3 to 4 months. By the end of the year, you will have purchased that $10 pack three or four times, spending $40 total and suffering the frustration of interrupted workouts.
Conversely, a premium fabric option like the TRX Glute Bands will easily survive 12 to 24 months of rigorous abuse with zero degradation in elasticity. You pay more upfront, but you close the “efficiency gap.”
The Hidden Cost of Poor Tension:
The real hidden cost isn’t financial; it’s physiological. As cheap latex degrades, it loses its tension memory. A band rated for 20 lbs of resistance might only yield 12 lbs after two months of use. This robs you of progressive overload, meaning you are putting in the time and sweat but missing out on the muscular adaptation. Paying for professional-grade tension ensures your effort actually translates to results.

🛑 Features That Actually Matter (And Those That Don’t)
Amazon listings are flooded with marketing hype. As a consultant, here is how I filter the noise.
What Actually Matters:
-
Continuous Dipping Process (Latex): High-end latex bands are made by continuously dipping molds into liquid latex, creating microscopic layers (like an onion). This prevents snapping. Cheap bands are molded in one thick sheet and sliced, leaving jagged microscopic edges that tear easily. Look for “layered latex” in the specs.
-
Inner Grip Strips (Fabric): A fabric band without silicone grip strips on the inside is useless. It will slide down your legs the moment you start sweating.
-
Length Specificity: A 9-inch band and a 12-inch band serve entirely different biomechanical purposes. Know which length you are buying.
What DOES NOT Matter:
-
“Poundage” Equivalents: Brands love to say their band equals “50 lbs of resistance.” This is highly misleading. Resistance in elastic bands is variable—it depends entirely on how far it is stretched. Fifty pounds at full extension might only be 10 pounds at a quarter-stretch. Focus on relative difficulty (Light vs. Heavy) within a specific brand’s ecosystem rather than arbitrary numbers.
-
Workout Guides Included: Don’t buy a band just because it comes with an eBook or a poster. According to the American Council on Exercise, proper form requires dynamic assessment, not just looking at stick figures on a poster. You can find better, free instructional videos online.
🏃♀️ What to Expect: Real-World Performance
The spec sheet won’t tell you this, but working with mini bands requires an ego check. If you can squat 300 pounds with a barbell, you might assume you need the “Extra-Heavy” band for lateral walks. You will likely be humbled within 15 seconds.
Because mini bands primarily target the abductors (the muscles on the outside of the hip, like the gluteus medius and minimus), they isolate muscles that standard sagittal-plane lifts (like squats and deadlifts) largely ignore.
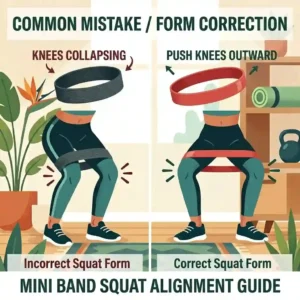
During your first week of real-world use, expect deep, cramping sensations in your upper glutes. This isn’t an injury; it is a sign of profound neuromuscular activation. You will also notice that your knees stop “caving in” (valgus collapse) during your standard heavy lifts, because the bands have finally taught your brain how to recruit your abductors to stabilize the femur.
🔬 The Biomechanics of Glute Activation
To truly understand why these loops are so effective, we have to look at biomechanics. When you put a band around your knees and perform a squat, the band applies an inward, medial force.
Your body’s natural proprioceptive response is to fight this force by externally rotating and abducting the hips. This action is governed heavily by the gluteus medius. According to studies indexed by the National Institutes of Health, targeted activation of the gluteus medius significantly reduces patellofemoral pain syndrome (runner’s knee) and lower back pain.
By utilizing mini bands during your warm-up, you are essentially pre-exhausting and “waking up” these dormant stabilizers. When you then move on to your heavy, unbanded lifts, the nervous system has already established a strong connection to those muscles, leading to safer and more powerful movement patterns.
✨ Don’t Miss These Exclusive Deals!
🔍 Ready to activate those stabilizers? Click on any highlighted item to check current pricing and availability. Equip your gym with the right gear today!

🏁 Conclusion: The Final Verdict on Resistance Loops
Integrating mini bands into your fitness routine is one of the highest ROI decisions you can make for your joint health and physical performance. The key is recognizing that these are not one-size-fits-all tools.
If your goal is heavy glute hypertrophy without the frustration of pinched skin, investing in a premium fabric option like the Arena Strength or TRX Glute Bands is a no-brainer. However, if you are rehabbing a delicate shoulder or working on intricate mobility, the clinical precision of TheraBand or Perform Better latex loops remains undefeated. Treat them with care, keep them out of the sun, and they will transform the way you move.
❓ FAQs
❓ What are mini bands best used for?
✅ Mini bands are best used for activating the glute muscles, improving hip stability, and providing joint-friendly resistance for physical therapy. They excel in lateral movements, core stabilization exercises, and as a cueing tool to prevent knee collapse during heavy squats…
❓ Can mini bands build muscle?
✅ Yes, they can build muscle through progressive overload and time-under-tension. While they won’t build massive bulk like heavy barbells, they are highly effective for hypertrophy in smaller stabilizing muscles like the gluteus medius and shoulder rotators…
❓ Which is better, latex or fabric mini bands?
✅ It depends on the exercise. Fabric bands are wider, won’t roll up on bare skin, and are best for heavy lower-body movements. Latex bands offer more stretch versatility, making them superior for upper body mobility and clinical rehabilitation…
❓ How long do resistance loops usually last?
✅ With daily use, budget latex loops usually last 3 to 6 months before losing elasticity or tearing. Professional-grade layered latex or high-quality fabric bands can easily last 1 to 2 years if kept out of extreme heat and direct sunlight…
❓ Where exactly should I place the mini band on my legs?
✅ For most exercises, place the band either two inches above the knee on the lower thigh, or around the ankles. Never place the band directly over the kneecap, as this creates harmful shearing force on the joint…
📚 Recommended for You
- 7 Best Light Exercise Bands for Amazing Low-Impact Home Workouts 2026
- 5 Best lightweight resistance bands for 2026: Expert Field Tests & Review
- 5 Best medium exercise bands for 2026: Expert Field Test & Review
Disclaimer: This article contains affiliate links. As an Amazon Associate, I earn from qualifying purchases. If you purchase products through these links, we may earn a small commission at no additional cost to you.
✨ Found this helpful? Share it with your friends! 💬🤗
[addtoany]