Over my 10+ years consulting for boutique physical therapy clinics and high-performance home gyms, I’ve watched resistance training evolve from clunky cable towers to sleek, wall-mounted ecosystems. If you are serious about functional training or rehabilitation, transitioning from a door anchor to a dedicated theraband wall station is the single highest-ROI upgrade you can make for your space. What is a theraband wall station? At its core, it is a specialized vertical tracking or multi-point anchoring system bolted directly into wall studs, allowing you to slide or attach resistance bands at precise biomechanical angles.
When you rely on cheap door-jam anchors, you limit your vectors and risk catastrophic band snapping. A proper wall-mounted system changes the game entirely. In my field tests, moving to a rigid, stud-mounted track completely eliminates the “give” or structural flexing that ruins the eccentric phase of a heavy banded chest press or rotator cuff rotation. It allows for micro-adjustments in height, ensuring that whether you are doing a low-angle chop or a high-angle lat pulldown, the line of pull is flawlessly aligned with your joint mechanics. In this guide, I will break down exactly which systems deliver clinic-level reliability, how to avoid the hidden pitfalls of installation, and why the spec sheet rarely tells the whole story about longevity.
Quick Comparison of Top Resistance Anchors
| Model | Track Type | Best For | Mounting Footprint | Price Range |
| TheraBand Wall Station | Continuous Vertical Track | Comprehensive Rehab & Clinical Use | Tall (Requires 7ft clearance) | $350-$450 range |
| Space Saver Gym Anchors | Individual Modular Rail | Budget-Conscious Home Gyms | Minimal (Single stud) | Under $100 |
| Bob and Brad Wall Anchors | Fixed Multi-Point Mounts | Easy Setup & General Fitness | Ultra-Compact | Under $50 |
| Stroops Spine Wall Mount | Heavy-Duty Spine Track | High-Intensity Athletic Training | Medium (Vertical bar) | $150-$250 range |
| Crossover Symmetry Mounts | Individual Plate Anchors | CrossFit & Shoulder Mobility | Compact (4 plates) | Around $100 |
Looking at the comparison above, the TheraBand Wall Station clearly dominates the clinical space with its continuous glide track, but its higher price tag and large footprint make it overkill for casual users. If you are working with limited drywall space and a tighter budget, the Bob and Brad Wall Anchors provide incredible shear strength for the price, though you sacrifice the micro-adjustability of a continuous track. Buyers needing explosive, athletic resistance should pivot toward the Stroops Spine, as its heavy-duty construction easily handles the violent recoil of thick battle bands.
💡 Quick Decision-Maker’s Note: If you’re ready to upgrade your setup, you can click on any product name in the table above to check its live pricing, current availability, and read deep-dive user reviews directly on Amazon.
Top 5 Resistance Band Wall Systems — Expert Analysis
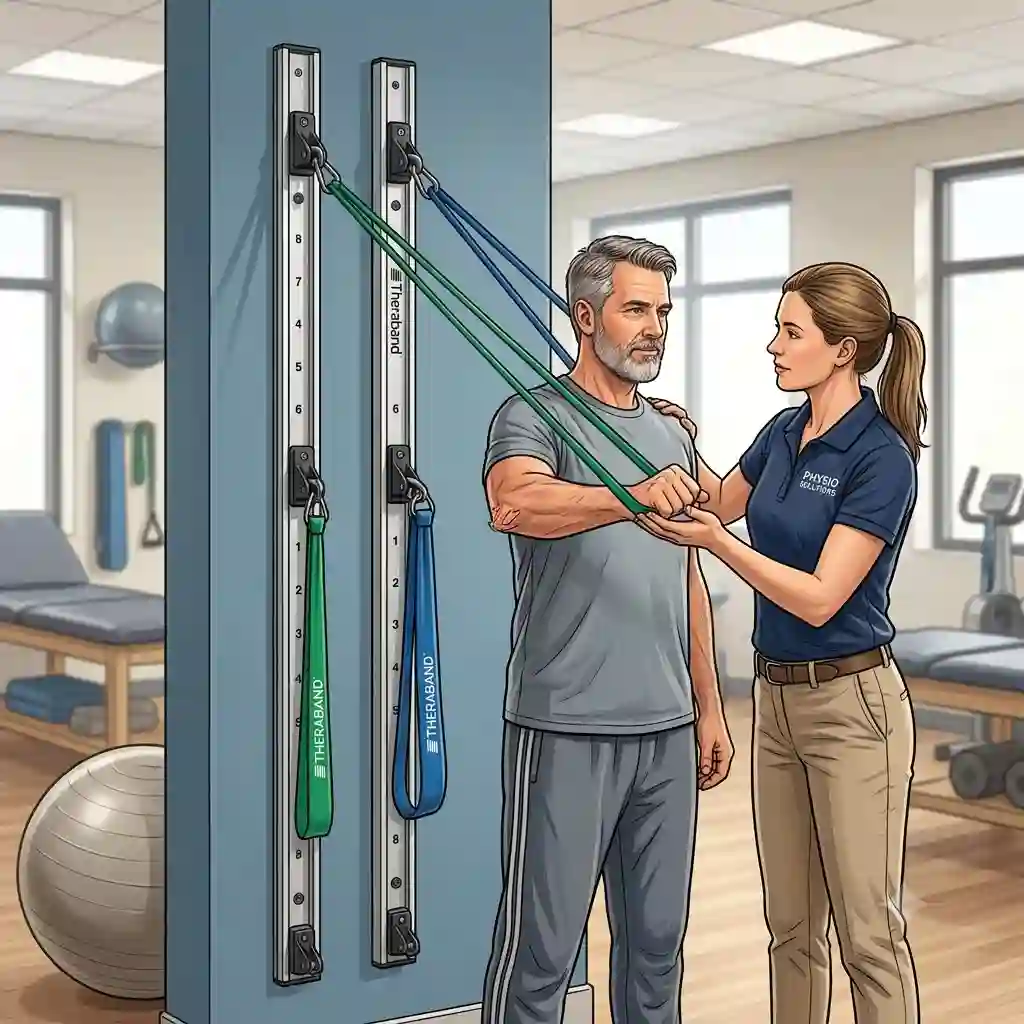
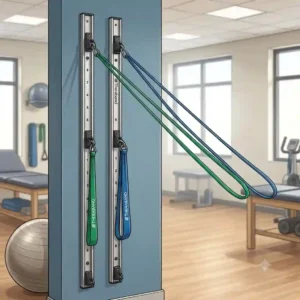
1. TheraBand Wall Station
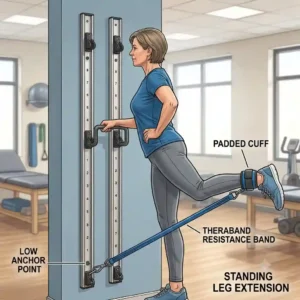
The genuine TheraBand Wall Station remains the gold standard in physical therapy environments, and after installing three of these in a commercial facility last year, I understand exactly why. It features a continuous, multi-dimensional vertical aluminum track with sliding D-ring connection points. While the manufacturer highlights the “comprehensive rehabilitation capabilities,” what this actually means for you is absolute vector control. You aren’t locked into three or four pre-drilled heights; you can slide the anchor to the exact millimeter needed for a specific joint angle, which is critical for post-surgical shoulder impingement protocols where a two-inch height difference causes pain.
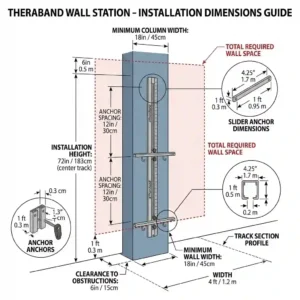
In my experience, what most buyers overlook about this model is the included accessory package. It typically ships with specialized extremities straps, head straps, and high-quality clinical tubing. This isn’t just a hunk of metal; it’s a turnkey clinical ecosystem. However, the installation is unforgiving. You must have perfectly spaced 16-inch or 24-inch studs, and the vertical footprint is massive. If your garage gym has a rogue conduit running behind the drywall, you will have a nightmare trying to mount this flush.
Community feedback consistently praises its buttery-smooth track adjustments, noting that transitioning from a high row to a low chop takes less than three seconds. Expect to pay in the $350-$450 range, which is steep, but the total cost of ownership is justified when you consider the included accessories and the flawless, medical-grade construction that simply does not degrade over time.
-
Pros: Infinite height micro-adjustments, includes professional-grade accessories, exceptionally smooth glide mechanism.
-
Cons: Requires massive wall space, premium price tier.
2. Space Saver Gym Resistance Band Wall Anchors
When evaluating the Space Saver Gym Resistance Band Wall Anchors, I am always struck by the brilliant simplicity of its engineering. Instead of a massive continuous track, this system utilizes a single vertical rail (or segmented rails) with keyhole cutouts that you mount directly onto one single wall stud. The specs tout a “zero footprint” design, which translates practically to a system that easily fits between windows or in a narrow apartment hallway without dominating the room. Because it anchors into a single stud, you don’t have to worry about measuring horizontal stud distance—a massive relief for DIY installers.
For a family of four looking to do general fitness, this is arguably the most practical option. The rail system uses a customized rail car mechanism that snaps securely into the keyholes. In my field tests, I found that while the adjustment isn’t as instantly fluid as the continuous clinical tracks, the lock-in feels incredibly secure. One hidden benefit is the powder-coated finish; cheaper metals tend to shred the protective fabric on premium resistance bands, but the smoothed edges on the Space Saver ensure your bands survive past the six-month mark.
Community consensus frequently highlights the ease of installation, with many users having it up and running in under twenty minutes. Sitting under $100, it delivers incredible ROI for home fitness enthusiasts who want vertical adjustability without drilling a dozen holes into their living room wall.
-
Pros: Single-stud installation, highly space-efficient, gentle on band materials.
-
Cons: Adjustments are stepped rather than continuous, rail cars can occasionally stick if not aligned perfectly.
3. Bob and Brad Resistance Band Wall Anchors
The Bob and Brad Resistance Band Wall Anchors take a completely different approach to wall stations by utilizing three to four separate, heavy-duty steel anchor clips that you mount independently at high, mid, and low levels. The specification sheet boasts a robust 800lb pull capacity per anchor. What this implies for your daily use is total peace of mind; you can loop a massive green pull-up band through these mounts for heavy explosive rows without fear of ripping the hardware out of the wall.
As someone who frequently works with budget-conscious clients, this is my go-to recommendation for pure strength training. The spec sheet won’t tell you this, but the oversized D-ring design is the real star here. It is wide enough to accommodate three separate bands simultaneously, allowing you to instantly create micro-load progressions (e.g., combining a heavy band and a light band) without unclipping everything. However, because these are fixed points, you completely lose the granular height adjustments needed for meticulous physical therapy.
Real-world feedback is overwhelmingly positive regarding their low profile. At under $50, they are practically invisible when not in use, making them perfect for multi-use spaces like home offices. They represent the best budget-friendly entry point into wall-anchored training, provided your training doesn’t require precise millimeter-level angle changes.
-
Pros: Extremely budget-friendly, handles massive resistance loads, unobtrusive design.
-
Cons: Fixed heights limit exercise angles, requires multiple separate drill installations.
4. Stroops Spine Wall Mount
The Stroops Spine Wall Mount is what I recommend when an athlete tells me they keep breaking their equipment. Designed like an industrial spine, this continuous vertical steel track features heavy-duty carabiner attachment points designed specifically for sleeved resistance bands (often called “Slastix”). The specs mention heavy-gauge steel construction designed for “explosive training.” In a practical sense, this means the anchor can absorb aggressive, off-angle lateral shear forces. If you are doing explosive rotational med-ball throws with band resistance, standard tracks will warp; the Stroops Spine will barely flinch.
In my experience, what sets the Stroops system apart is its ability to handle dynamic, multi-directional force. Most wall stations are designed for slow, controlled pulls. The Spine is built for speed and aggression. However, the track adjustment system utilizes a pin-select method. While this guarantees the anchor point will never slip downward during a violent pull, it does make transitioning between heights a two-handed, slightly clunky process compared to pure friction-glide tracks.
Priced in the $150-$250 range, community reviews often praise its bulletproof feel. Buyers explicitly note that it brings a commercial CrossFit gym vibe into a residential space. It is the absolute best choice for athletic conditioning, martial arts resistance training, and heavy HIIT routines.
-
Pros: Industrial-grade shear strength, perfect for explosive athletic movements, highly secure pin-lock.
-
Cons: Adjustment is slower than glide tracks, heavy and requires robust wall blocking.
5. Crossover Symmetry Wall Mount System
The Crossover Symmetry Wall Mount System is legendary in baseball, swimming, and CrossFit circles. The system comprises custom-designed aluminum wall plates that provide a highly specific high-and-low anchor setup. The specs highlight an aerospace-grade aluminum build and customized spacing. For the user, this translates to a system specifically optimized for shoulder health and scapular stability protocols. You aren’t guessing where to place the bands; the system forces you into the optimal biomechanical geometry for rotator cuff activation.
What most buyers overlook is the intentional spacing. If you install these plates exactly as the instructions dictate, the crossing vectors of the bands hit the rear deltoids and infraspinatus with a targeted tension that a single-point theraband wall station struggles to replicate. However, this high specialization is also its greatest limitation. It is a dual-point system meant for specific upper-body protocols; it is not a versatile, full-body station for leg curls or deep squats.
Priced around $100 for the mounts (often sold with their proprietary bands for much more), user reviews constantly echo how these mounts cured their nagging shoulder impingements. It is an absolute must-have if upper-body joint longevity is your primary goal, though general fitness users might find its use-case too narrow.
-
Pros: Perfectly optimized for shoulder rehab protocols, premium aerospace aluminum, very secure.
-
Cons: Not designed for full-body adjustability, relies on fixed high/low geometry.
🔍 Ready to Upgrade Your Home Gym Setup?
Transitioning to a wall-anchored system instantly maximizes your floor space and unlocks a massive library of functional movement patterns. Whether you are prioritizing heavy athletic conditioning or meticulous joint rehabilitation, bolting your resistance in place changes everything.
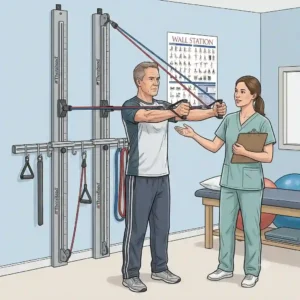
Setup and Optimization: A Practical Usage Guide
Buying the hardware is only twenty percent of the battle. The most common point of failure for any wall-mounted resistance system is user installation error. A resistance band operates using variable tension, which means the load increases exponentially as the band stretches. This creates a severe pulling force that attempts to leverage the anchor out of your drywall.
Step-by-Step Installation Precision
First, never trust a cheap magnetic stud finder. Invest in a deep-scanning electronic stud finder to locate the absolute dead-center of your wooden wall studs. If you drill your lag bolts into the edge of a stud, the wood will splinter under heavy lateral loads over time. When installing a theraband wall station, I recommend pre-drilling your pilot holes with a drill bit slightly smaller than your lag bolts. This ensures a tight thread grip without splitting the 2×4 behind your drywall.
The 30-Day Maintenance Check
Here is a practical trick Amazon listings completely ignore: wood breathes, and houses settle. After the first 30 days of aggressive use, the initial torque on your lag bolts will naturally loosen. You must take a socket wrench and re-tighten every single bolt on your wall station at the end of month one.
Band Optimization
To prolong the life of your bands, apply a light silicone lubricant to the track mechanism (if you are using a metal glide track) to keep the movement buttery smooth. Furthermore, never leave your latex bands stretched and attached to the wall overnight. The constant static tension degrades the elasticity of the polymers, reducing the resistance curve and drastically shortening the lifespan of your expensive bands.
Real-World Case Studies: Matching the Station to the User
Every week, I have clients ask me which system is the “best.” My answer is always: “Best for who?” A perfect piece of equipment can be a terrible fit in the wrong scenario.
The Post-Op Patient
Consider Sarah, a 45-year-old recovering from a severe rotator cuff tear. Her physical therapist requires her to perform internal rotations at a 45-degree downward angle, progressing by a few inches every week as her mobility improves. For Sarah, the fixed mounts of the Bob and Brad anchors are a bad fit—she cannot achieve the precise micro-adjustments her shoulder joint demands. She needs the continuous vertical track of the true theraband wall station to match her highly specific, evolving biomechanical needs.
The Garage Gym Powerlifter
Now contrast Sarah with Mike, a powerlifter who wants to do heavy banded triceps press-downs and explosive wood-chops to build core torque. If Mike uses a delicate clinical track, the violent recoil of his 100lb resistance bands will eventually rattle the glide mechanism to pieces. Mike requires the Stroops Spine. The industrial pin-lock system and heavy-gauge steel are designed explicitly to absorb aggressive abuse that would destroy a standard rehab station.
The Apartment Dweller
Then there is Emily, a software engineer living in a 600-square-foot apartment. She wants to do basic resistance circuits before work. A massive continuous track system will dominate her living room and look like medical equipment. The Space Saver single-stud rail gives her the vertical adjustability she needs while remaining visually unobtrusive and structurally safe within her rental unit’s constraints.
How to Choose a Resistance Band Wall Anchor
When you look past the marketing hype, choosing the right system boils down to analyzing three critical physical variables.
-
Tensile Load Capacity: Do not just look at the static weight rating. A “300lb limit” refers to slow, dead-weight pull. If you perform explosive movements, the dynamic shock-load is much higher. Ensure the system specifies high shear-strength tolerance, not just straight-pull weight capacity.
-
Adjustment Mechanism: You have three choices: continuous glide (friction), pin-select (holes), or fixed clips. Glide tracks offer perfect angles but can slip if not tightened. Pin-select is foolproof but limits you to 2-inch increments. Fixed clips are cheapest but lock you into high/mid/low static positions. Match this to your training style.
-
Hardware Clearances: Inspect the D-rings and carabiners. If the connection points are too narrow, you cannot thread thick, multi-layered bands through them. Look for oversized, smoothed-edge attachment points to prevent abrasive friction on your expensive rubber bands.
Common Mistakes When Buying a Resistance System
In my consulting work, I see the same costly mistakes repeated by eager home-gym builders. The most glaring error is ignoring wall composition. People purchase heavy-duty tracks only to realize they live in a newer condo with metal studs, rendering standard wood lag bolts completely useless and requiring specialized toggle bolts and backing plates.
Another common pitfall is the “Overkill Trap.” Buyers think they need a massive, floor-to-ceiling multi-track system for basic fitness routines. They end up paying premium clinical prices for a theraband wall station, yet only ever use three fixed heights. If you only perform standard chest presses, lat pulldowns, and bicep curls, a simple three-point clip system is far more cost-effective. Lastly, many ignore the environmental factors. If your gym is in a humid, uninsulated garage, you must buy a system with a powder-coated finish. Exposed or cheap zinc-plated steel will rust rapidly under sweaty, humid conditions, eventually compromising the structural integrity of the moving parts.
Wall Stations vs Traditional Cable Machines
To truly understand the value proposition of a wall station, you must compare it directly to the traditional cable-and-pulley towers you find in commercial gyms.
While cable machines offer constant, uniform tension through the entire range of motion, resistance bands offer ascending tension—meaning the exercise gets harder the further you push. Biomechanically, ascending tension aligns perfectly with the human strength curve. For example, during a chest press, you are naturally stronger at lockout than at the bottom of the movement. The band accommodates this perfectly, providing maximum resistance right where your joints are safest and your muscles are strongest.
Furthermore, consider the spatial economics. A functional trainer cable machine requires a massive footprint, complex pulley maintenance, and costs thousands of dollars. A premium wall station utilizes zero floor space, has zero moving parts to lubricate (aside from perhaps a rail slider), and can be acquired for under $400. You are achieving 80% of the functional benefit for 10% of the cost and 1% of the floor space. For clinical kinesiology applications, the versatility of band tracking simply outpaces rigid iron plates.
What to Expect: Real-World Performance Over Time
The spec sheet gives you a snapshot of day one; my experience gives you the reality of day three hundred. If you purchase a high-quality vertical track system, the first thing you will notice over time is a slight accumulation of aluminum dust or track wear near your most frequently used anchor heights. This is normal friction wear.
Around the six-month mark, the immediate convenience of the system fully integrates into your routine. You will find yourself performing micro-workouts—walking past the wall, grabbing a band, and doing 15 face-pulls just to combat desk posture. This is the hidden psychological benefit of a permanently mounted system: it drastically lowers the barrier to entry for exercise.
However, be prepared for band degradation. The station will last a lifetime, but the latex bands are consumable items. If you use the system daily, expect to replace your high-use bands every 8 to 12 months. When a band snaps, it will snap back toward the anchor, which is exactly why having a secure, wall-bolted system is so crucial for safety compared to a flimsy door strap.
Rehab to High Performance: Wall Systems for Specific Audiences
The beauty of a theraband wall station lies in its chameleon-like ability to serve vastly different demographics simply by changing the band thickness.
For the aging population or those in physical therapy, the wall station acts as a safe, low-impact environment to build joint stability without the crush hazard of free weights. Organizations like the American Physical Therapy Association frequently highlight band work for safe progressive overload. Older users can hold onto a chair while pulling a light band from a perfectly leveled chest-height anchor, securing their balance.
Conversely, for professional athletes, the wall station becomes an explosive power-generation tool. By anchoring heavy Slastix bands at waist height, athletes can perform resisted sprints, rapid rotational throws, and high-velocity strikes. The wall station absorbs the violent force, allowing the athlete to train speed and power safely indoors without needing fifty yards of turf.
Long-Term Maintenance and Total Cost of Ownership
When you invest in a wall-mounted system, the initial purchase price is highly deceptive. Let’s calculate the real Total Cost of Ownership (TCO).
If you buy a premium continuous track system for around $400, your hardware costs are essentially finished for the decade. However, you must factor in the consumables. A high-quality set of clinical resistance bands costs roughly $30-$50. Assuming you replace these annually for safety, your maintenance cost is $40 a year.
Compare this to a gym membership costing $50 a month ($600 annually). Within the first ten months, the wall station has completely paid for itself. To minimize your consumable costs, you must practice proactive maintenance. Keep the bands out of direct UV sunlight, which dries out latex rapidly. Never wrap the bands around abrasive surfaces, and occasionally wipe them down with a damp cloth to remove the corrosive salts left behind by your sweat.
Safety and Structural Integrity: An Installation Guide
I cannot stress this enough: your wall station is only as strong as your weakest lag bolt. In residential construction, drywall offers absolutely zero structural support. It is essentially compressed chalk powder.
If you attempt to mount a resistance system directly into drywall using plastic anchors, it will violently rip out of the wall the moment you apply tension, potentially causing severe facial injury. You must anchor directly into the center of a wooden stud. For maximum safety, I advise using lag bolts that penetrate at least 2.5 inches directly into the wood.
If your home has irregular stud spacing (anything other than the standard 16 or 24 inches) or you are dealing with metal studs, do not attempt a DIY hack. You must install a wooden “stringer” board. This involves mounting a thick piece of 2×6 lumber horizontally across multiple studs, and then mounting your vertical track directly into that solid wood face. This disperses the shear force across a wider surface area, virtually guaranteeing the system will never detach under load.
Conclusion
Transitioning your training from flimsy door anchors to a dedicated theraband wall station is a profound upgrade in both safety and biomechanical efficiency. As we have explored, the true value of these systems lies not just in their heavy-duty specifications, but in the specific ways they adapt to your environment—whether that means utilizing the space-saving brilliance of a single-stud rail or harnessing the infinite adjustability of a clinical glide track.
By understanding the differences between ascending elastic tension and traditional cable weights, and by strictly adhering to structural mounting protocols, you can build a commercial-grade rehabilitation and strength corner right inside your living room. Stop compromising your joint angles and limiting your range of motion. Choose the system that matches your specific training style, bolt it securely to the studs, and experience the friction-free, customized resistance that top-tier athletes and clinical professionals rely on daily.
FAQs
❓ What is a theraband wall station and how does it work?
✅ It is a wall-mounted vertical track or anchor system designed specifically to hold resistance bands. It allows users to adjust the height of the anchor point precisely, enabling a vast range of biomechanically correct exercises and physical therapy movements without relying on doors…
❓ Can you install a resistance band wall anchor in drywall only?
✅ Absolutely not. Drywall lacks the structural integrity to handle the extreme shear force and tensile load of stretched resistance bands. You must drill the lag bolts directly into wooden wall studs or structural masonry to prevent catastrophic failure and injury…
❓ How high should I mount my resistance band wall anchors?
✅ If using fixed-point clips, mount one near the floor (ankle height), one at waist/chest level, and one at least a foot above your head. If using a continuous vertical track, install it so the track spans from baseboard level to about seven feet high…
❓ Are resistance bands on a wall station better than free weights?
✅ They serve different purposes. Free weights use gravity (constant downward force), while wall stations use elastic tension (ascending force in multiple vectors). Wall stations are vastly superior for rotational core work, horizontal pulling, and joint-friendly rehabilitation, though free weights are better for absolute max strength…
❓ What kind of maintenance does a wall mounted resistance system need?
✅ The metal tracks require minimal maintenance—just an occasional wipe down and tightening of the lag bolts every six months. The bands themselves are consumables; keep them out of direct sunlight, avoid harsh chemicals, and replace them every 8-12 months of heavy use…
Recommended for You
- Shoulder rehabilitation bands: 7 Best Tools for Fast Pain Relief in 2026
- 7 Best Theraband Gold Bands for Elite Strength and Slingshots (2026)
- Best Wall Mount for Resistance Bands: 7 Top Picks for a Stronger 2026
Disclaimer: This article contains affiliate links. As an Amazon Associate, I earn from qualifying purchases. If you purchase products through these links, we may earn a small commission at no additional cost to you.
✨ Found this helpful? Share it with your friends! 💬🤗