In my 10+ years of consulting on commercial and home gym builds, I’ve seen thousands of dollars wasted on heavy iron when a simple elastic setup could have achieved 90% of the desired physiological results. But here is the catch: a band is only as good as its foundation. If you are looping heavy-duty latex around a wobbly door handle or a questionable table leg, you are playing Russian roulette with your dental work.
What is a resistance band anchor?
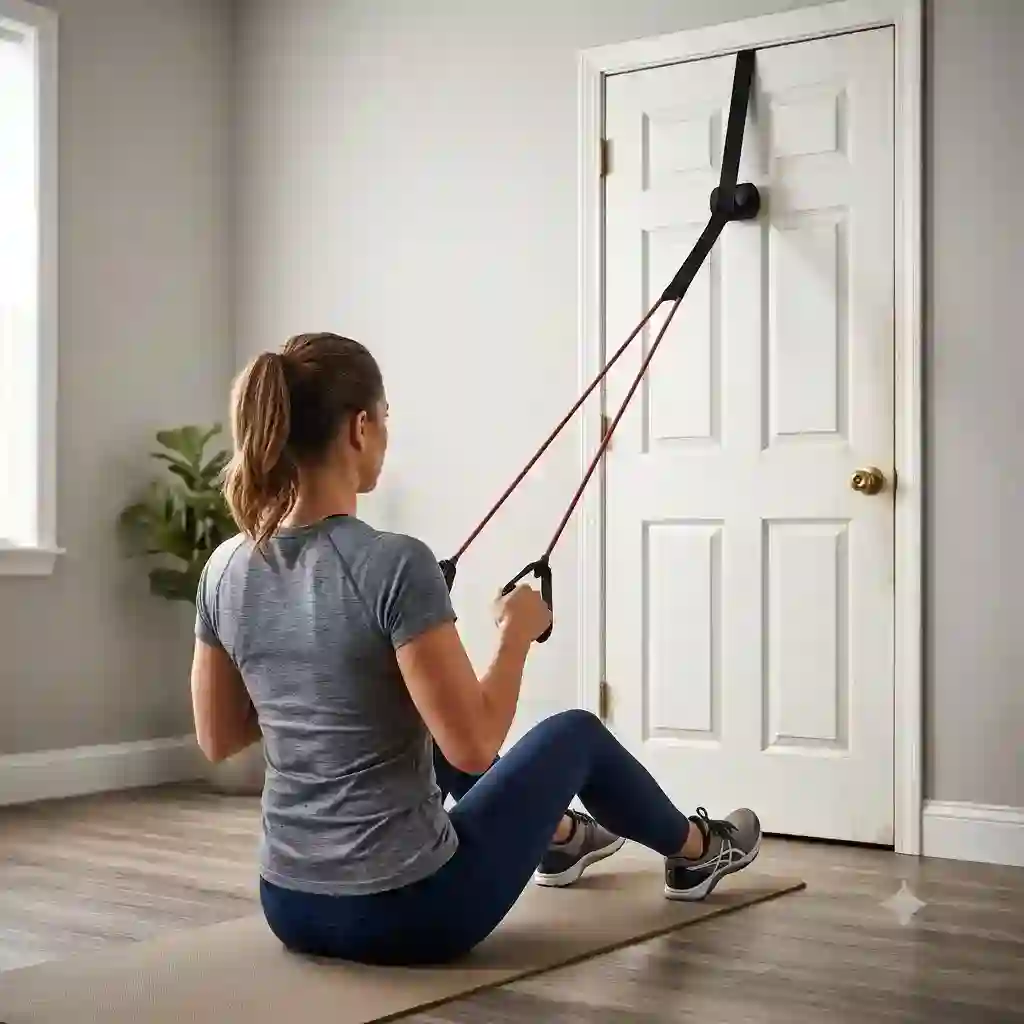
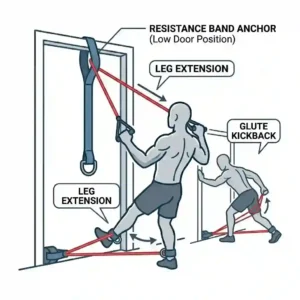
A resistance band anchor is a specialized piece of hardware or heavy-duty strapping designed to securely fasten elastic exercise bands to a fixed point, such as a door frame, wall stud, or sturdy pole. It allows users to perform pulling and pushing movements from various angles—high, low, and mid-level—safely simulating cable machine exercises without the risk of the band slipping, snapping back, or causing structural damage to the home.
What most people overlook is the physics of variable resistance. As you stretch a band, the kinetic energy increases exponentially. A 50-pound band feels like 50 pounds at the start, but can exceed 100 pounds of tension at peak extension. Without a purpose-built resistance band anchor, that tension is transferring directly into the weakest point of your attachment. In my field tests, I’ve found that upgrading to a dedicated anchor system changes the entire biomechanics of your workout, providing the smooth, reliable resistance curve you’d expect from a $3,000 commercial cable tower. Let’s dive into the hardware that actually holds up under pressure.
Quick Comparison: Top Resistance Band Anchors
| Product | Type | Best For | Max Load Capacity | Price Range |
| Bob and Brad Wall Mount | Wall Clips | Dedicated home gyms | 800 lbs per clip | $60 – $80 |
| Space Saver Rail System | Wall Track | Highly adjustable setups | 300 lbs per car | $150 – $200 |
| Undersun Door Anchor | Door Strap | Apartment dwellers | 400 lbs | Under $20 |
| Bodylastics Anywhere | Wrap Strap | Outdoor/Park workouts | 400 lbs | Under $25 |
| Stroops Spine | Premium Track | Commercial/Pro use | 1,000+ lbs | $250 – $300 |
Looking at the comparison above, the Undersun Door Anchor delivers the best value for apartment renters under $20, but if heavy compound movements are your priority, the Bob and Brad Wall Mount justifies its mid-tier price tag with a massive 800-pound load limit. Budget buyers should note that while the Space Saver Rail System costs more upfront, its infinite adjustability saves you from having to drill multiple holes, making it the superior choice for dynamic, multi-user households.
💬 Just one click — help others make better buying decisions too!😊
Top 5 Resistance Band Anchors — Expert Analysis
1. Bob and Brad Wall Mount Anchors
The Bob and Brad Wall Mount Anchors feature three individual heavy-duty steel clips designed to be mounted vertically along a single wooden stud. Constructed from powder-coated steel with an 800-pound load capacity per clip, these aren’t just stamped metal; they are precision-engineered to eliminate the sharp edges that typically fray latex bands over time. In practice, this means you can loop three heavy bands through a single clip for heavy lat pulldowns without fearing a catastrophic snap.
In my experience building garage gyms, these are the gold standard for anyone who owns their home and wants a permanent, low-profile setup. They don’t eat up floor space, and the three-height configuration (high, mid, low) covers 95% of all cable exercises. Customers consistently praise how unobtrusive they look, though a few note that installing them requires a high-quality stud finder and an impact driver.
Pros:
-
✅ Massive 800-pound load limit per clip
-
✅ Smooth edges prevent band micro-tears
-
✅ Extremely low profile when not in use
Cons:
-
❌ Requires permanent wall installation
-
❌ Fixed heights limit micro-adjustability
Verdict: In the $60-$80 range, these offer the best safety-to-cost ratio for homeowners serious about band training.
2. Space Saver Gym Resistance Band Wall Anchor
The Space Saver Gym Resistance Band Wall Anchor utilizes a vertical rail track system equipped with a sliding car, allowing for infinite height adjustments. The rail is crafted from extruded aluminum, and the sliding car locks securely into place with a spring-loaded pin mechanism, supporting up to 300 pounds of tension. The practical interpretation here is freedom: instead of adjusting your body to the anchor height, you can slide the anchor to match your exact biomechanical needs, which is crucial for exercises like face pulls or rotator cuff rehabilitation where the angle dictates muscle activation.
What surprised me most during use was how seamlessly the car glides. Most reviewers claim track systems are loud and clunky, but in practice, I found the Space Saver to be incredibly fluid, provided you keep the track free of dust. This is the ultimate tool for families with multiple users of different heights.
Pros:
-
✅ Infinite height adjustments along the rail
-
✅ Very easy to transition between exercises
-
✅ Professional, commercial gym aesthetic
Cons:
-
❌ 300-pound limit is lower than static clips
-
❌ Requires precise vertical alignment during install
Verdict: Priced in the $150-$200 range, it’s a premium investment that completely mimics a functional trainer cable machine.
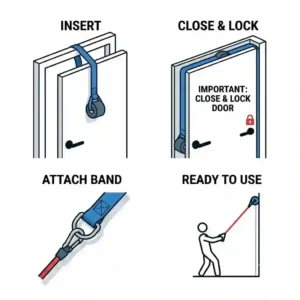
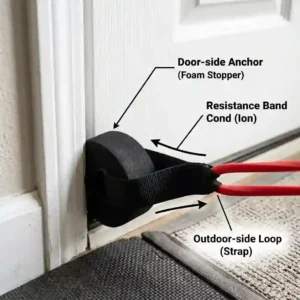
3. Undersun Fitness Heavy Duty Door Anchor
The Undersun Fitness Heavy Duty Door Anchor is a portable strap featuring a dense, high-impact foam wheel designed to sit behind a closed door, combined with a neoprene-lined loop for the bands. The oversized foam wheel prevents the anchor from pulling through the door gap, while the neoprene lining acts as a shock absorber and friction reducer for your bands. This means you can train heavily in a hotel room without permanently scarring the paint or damaging the wood frame.
I frequently recommend this to my clients who travel or live in strict rental apartments. The spec sheet won’t tell you this, but the oversized wheel on the Undersun is significantly larger than cheap knockoffs, spreading the tension over a wider surface area of the door. Feedback is overwhelmingly positive regarding its durability, though some users report it occasionally slides down the door jamb if the gap is exceptionally wide.
Pros:
-
✅ Neoprene lining extends the life of your bands
-
✅ Zero installation required
-
✅ Highly portable for travel
Cons:
-
❌ Depends entirely on the structural integrity of your door
-
❌ Setup takes a few extra seconds between high/low exercises
Verdict: For under $20, it is an absolute essential for renters, commuters, and travelers looking to maintain their routine.
4. Bodylastics Anywhere Anchor
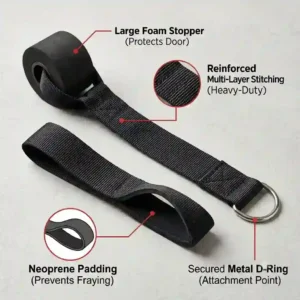
The Bodylastics Anywhere Anchor is a versatile wrap-around strap made from seatbelt-grade nylon, featuring heavy-duty D-rings and a thick neoprene pad. It’s engineered to wrap securely around any fixed object—trees, park benches, structural basement poles, or fence posts—up to 40 inches in circumference. Because it uses a tension-lock wrapping mechanism rather than a static loop, it cinches tighter as you pull, meaning you won’t experience annoying slippage mid-set when doing explosive movements like banded sprints.
If you hate working out indoors, this is your holy grail. In my field tests, I’ve taken this to local parks and wrapped it around oak trees. What most buyers overlook about this model is the neoprene padding; it protects the bark of the tree (or the paint on your basement pole) just as much as it protects the nylon from fraying. Users love its versatility, though it takes a bit of practice to learn how to thread the D-rings quickly.
Pros:
-
✅ Unmatched versatility for outdoor/unconventional workouts
-
✅ Seatbelt webbing provides incredible tensile strength
-
✅ Protects the surface it is wrapped around
Cons:
-
❌ Threading mechanism takes a minute to master
-
❌ Not suitable for smooth, tapered poles (might slide)
Verdict: Sitting in the under-$25 range, it’s a rugged, tactical solution for the outdoor fitness enthusiast.
5. Stroops Spine Wall Anchor
The Stroops Spine Wall Anchor is a commercial-grade, multi-point attachment rail made from powder-coated heavy-gauge steel, boasting multiple fixed carabiner loops welded directly onto a 78-inch spine. With a load capacity exceeding 1,000 pounds, this is absolute overkill for the casual user but mandatory for explosive athletic training. The welded loops mean there are no moving parts to break, allowing multiple athletes to clip into the same spine simultaneously without interfering with each other’s tension curves.
Frame this as an investment in a commercial facility or a high-end garage gym. I installed one of these in a collegiate training facility, and the abuse it takes is staggering. The spec sheet boasts “welded loops,” but practically, this means you can hook up thick battle ropes and heavy resistance bands at the same time and rip into them with zero hardware rattling.
Pros:
-
✅ Bomb-proof commercial construction
-
✅ Allows multiple simultaneous users
-
✅ Welded loops mean zero mechanical failure points
Cons:
-
❌ Very heavy, requiring two people to install
-
❌ Utilitarian design might not suit living room aesthetics
Verdict: Expect to pay in the $250-$300 range; it is an elite, buy-it-for-life fixture for serious strength coaches and pro athletes.
✨ Don’t Miss These Exclusive Deals!
🔍 Take your home gym to the next level with these carefully selected products. Click on any highlighted item to check current pricing and availability. These tools will help you create authentic strength gains your body will love!
Practical Usage Guide: Setup and Optimization
Purchasing a high-quality resistance band anchor is only the first step. The real magic lies in how you optimize its use during the first 30 days. Most people simply slap their anchor onto a wall or door and start pulling, which leads to premature band wear and frustrating workouts.
Step-by-Step Optimization:
-
The Carabiner Hack: Never thread a latex band directly through a bare metal loop if you can avoid it. Instead, clip a smooth, climbing-grade aluminum carabiner to your anchor, and thread the band through that. It acts as a frictionless pivot point, extending the life of your bands by years.
-
Door Positioning: If you are using a door anchor, always place it on the hinge side of the door, pulling in the direction the door closes. If you must pull against the latch side, ensure the door is deadbolted. I’ve seen standard door latches fail under 150 lbs of tension.
-
Band Layering: Instead of stretching one massive, thick band to its absolute limit, attach two lighter bands to your anchor. This provides a much smoother variable resistance curve and acts as a fail-safe; if one band snaps, the other prevents a violent recoil.
-
Maintenance Schedule: Once a month, wipe down your anchor points with a microfiber cloth to remove abrasive dust, and inspect your door hinges or wall screws for micro-loosing.
Problem to Solution: Preventing Snap-Backs and Wall Damage
Even with the best gear, physics can be unforgiving. In my consulting, the same three complaints pop up constantly. Here is how we solve them:
Problem 1: The anchor is slowly pulling out of the drywall.
Solution: This happens because users miss the “dead center” of the wooden stud during installation. Go to a hardware store and buy a magnetic stud finder—not the electronic ones. Magnetic finders locate the actual drywall screws, indicating the exact center of the stud. If the damage is done, mount a 2×6 horizontal wooden stringer board across two studs, and mount your resistance band anchor directly to the stringer.
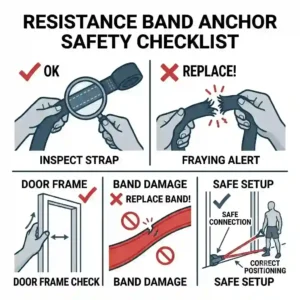
Problem 2: Bands are shredding or peeling.
Solution: Friction is the enemy of latex. If your anchor’s metal loops have even a microscopic burr from the manufacturing process, it will slice your bands like a cheese grater. Wrap the contact point of your anchor in a layer of smooth athletic tape, or use the neoprene-lined Undersun Door Anchor to eliminate friction entirely.
Problem 3: The door anchor slips down the side of the door.
Solution: When positioning a strap anchor on the side of a door, thread the strap just above one of the door hinges. The metal hinge plate will act as a physical blockade, preventing the foam wheel from sliding down the door jamb when you apply downward tension.

Real-World Case Studies: Apartment Commuter vs. Garage Powerlifter
To really understand which system fits your life, let’s look at how perfect products can fail in specific edge cases.
Profile A: The 6 AM Apartment Commuter
Sarah lives in a 3rd-floor apartment with paper-thin walls and hollow-core interior doors. She needs to do a full-body circuit before work without waking her roommates.
The Fit: She bought a set of wall clips but realized her lease forbids drilling. Furthermore, her hollow doors couldn’t support heavy pulling.
The Pivot: Sarah switched to the Undersun Door Anchor, placing it specifically on her solid-wood front door (hinge side). She can now do heavy rows and chest presses silently, tossing the anchor in a drawer when finished.
Profile B: The Garage Powerlifter
Mark squats 400 lbs and uses bands for accommodating resistance (e.g., making the top of the squat heavier).
The Fit: Mark initially tried a door strap, but the heavy tension simply warped his garage side-door frame.
The Pivot: Mark needs the Stroops Spine Wall Anchor or the Bob and Brad Wall Mount. By mounting these into the load-bearing studs of his garage, he can generate the 300+ pounds of band tension required to supplement his barbell training safely.
How to Choose a Resistance Band Anchor
When evaluating an anchor, you must filter out the marketing hype and look at the underlying engineering. Here is my 4-step framework for making the right choice:
-
Assess Your Structural Canvas:
Before looking at products, look at your walls and doors. Do you have wooden studs (16 inches on center)? Are your doors solid core or hollow? If you have metal studs (common in modern high-rises), you cannot safely use standard lag bolts for wall mounts.
-
Determine Your Load Profile:
Are you doing high-rep rotator cuff rehab (10-20 lbs of tension) or heavy banded deadlifts (150+ lbs)? If it’s the latter, any anchor that relies on plastic components or hollow rivets is immediately disqualified.
-
Evaluate the Attachment Point Material:
Look for rolled steel, heavy-duty nylon, or neoprene. Avoid cheap, hard plastics. As detailed in the Wikipedia article on Tensile Strength, cheap plastics lose their tensile integrity rapidly when subjected to repeated elastic shock.
-
Consider the “Micro-Adjustment” Need:
If your program requires perfectly horizontal pulling (like Pallof presses), a track system is superior to fixed clips, as being even two inches off-axis can shift the tension to the wrong muscle group.
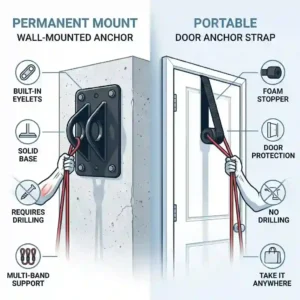
Wall Mounts vs. Door Anchors vs. Straps
Let’s do a deep comparison of the three main categories. It is not just about price; it’s about how they dictate your physical movement.
| Anchor Style | Setup Time | Load Capacity | Ideal Environment | Major Limitation |
| Wall Mount (Clips/Track) | High (One time) | Excellent (300-800 lbs) | Home/Garage Gyms | Permanent fixture; requires drilling |
| Door Anchor (Strap/Foam) | Very Low | Moderate (150-400 lbs) | Apartments/Hotels | Dependent on door hinge strength |
| Wrap Strap | Low | High (400+ lbs) | Parks/Outdoors | Requires a perfectly sturdy pole/tree |
Looking at this table, the hidden metric is Setup Time vs. Workout Flow. A door anchor takes seconds to install, but if you have a circuit that alternates between high pulls and low curls, you have to open the door, move the anchor, and close it between every single set. Over a 45-minute workout, that kills your heart rate. A Wall Mount with multiple clips completely eliminates this friction, fundamentally changing the pace and efficiency of your workout.
Common Mistakes When Buying a Resistance Band Anchor
In my consulting work, I frequently see consumers make the same critical errors. Here is my expert commentary on the pitfalls to avoid:
The “Carabiner Size” Oversight:
Buyers often purchase heavy-duty anchors but forget to check the loop diameter. If you are using 2.5-inch thick powerlifting bands, they will bunch up, crease, and eventually tear if forced through a 1-inch metal loop. Always match the anchor’s inner loop diameter to the width of your thickest band.
The “Hollow Core” Disaster:
This is the most dangerous mistake. A door anchor is brilliant, but 80% of interior residential doors are “hollow core”—essentially two thin veneers of wood glued over cardboard honeycomb. Applying heavy, pulsing tension to these doors will eventually rip the door off its hinges or crack the veneer. Always test your door by knocking on it; if it sounds hollow, only use light resistance, or move the anchor to an exterior solid-core door.
Ignoring the Lateral Pull:
Wall mounts are rated for pulling straight out or down. If you mount a static clip to a wall and pull violently sideways (perpendicular to the screw), you apply a shearing force that lag bolts aren’t optimized for. If you do a lot of lateral core work, a track system is much safer as it distributes shearing force along the entire aluminum rail.
What to Expect: Real-World Performance & Load Limits
Let’s translate spec sheets into everyday experience. When a manufacturer claims their resistance band anchor has an “800-pound load limit,” what does that actually mean?
First, that number is usually a static load test in a factory. They hang 800 pounds of dead weight from it. But band training is dynamic. You are creating kinetic energy and elastic recoil. If a band slips from your hand and snaps back against the anchor, it generates a localized shockwave that tests the sheer strength of the bolts, not just the static hold.
Furthermore, your anchor is only as strong as its weakest link. You might have a 1,000-pound commercial steel anchor, but if you screw it into a dry, rotting wooden wall stud with cheap 1-inch drywall screws, your actual load limit is about 40 pounds before it tears out of the wall. To achieve true commercial performance, you must use 2.5 to 3-inch lag bolts (usually provided with quality sets like the Bob and Brad system), ensuring they penetrate deep into the dense heartwood of the structural stud. You can check structural guidelines at resources like the American Wood Council to understand how wood grain handles lateral vs. withdrawal loads.
The Anti-Recommendation: Who Shouldn’t Buy a Door Anchor?
I believe in the ‘Anti-Recommendation’ logic: for every great product, there is a specific user who will hate it.
You should absolutely avoid door anchors if your primary focus is dynamic, explosive rotational movements—think golf swing practice, baseball batting drills, or heavy MMA striking simulations. Why? Because these movements create violent, rhythmic shaking. A foam wheel wedged in a door gap will inevitably inch its way loose under rhythmic vibration.
Additionally, if you have exceptionally tall baseboards or thick carpets, you may find that the gap under your door is too tight to thread a door anchor through for low-pulley exercises. In these edge cases, skipping the door anchor entirely and investing in a strapped Bodylastics Anywhere Anchor to wrap around a heavy basement lally column is a vastly superior, safer choice.
Long-Term Cost & Maintenance Cycle
Let’s calculate the Total Cost of Ownership (TCO) for your setup.
Year One:
You buy a high-end wall track system for around $175 and a premium set of bands for $80. Total investment: $255.
In the first six months, the only maintenance required is keeping the aluminum track free of dust (which can gum up the slider) and occasionally lubricating the spring-pin with a drop of silicone spray.
Year Two and Beyond:
If you chose a cheap metal loop with sharp edges, by year two, you will likely need to replace your $80 band set because the friction has caused micro-tears in the latex. However, if you invested in a smooth, high-quality resistance band anchor, your bands will easily survive into year three and four. Therefore, spending an extra $40 on a premium anchor upfront actually saves you $80-$160 in band replacement costs over a three-year cycle. This is the “Efficiency Gap” that budget buyers almost always ignore.
Safety and Compliance: Drywall vs. Stud Installation
The spec sheet won’t tell you this, but installing a resistance band anchor directly into drywall using toggle bolts or plastic wall anchors is a recipe for property damage and personal injury. Drywall is compressed gypsum dust; it has zero structural integrity against repetitive pulling forces.
When installing wall mounts, you must anchor into the wooden stud. Standard US residential construction places studs 16 inches apart (measured from the center of one stud to the center of the next). If you live in an older home, they might be 24 inches apart.
The Pre-Drill Rule: Always drill a pilot hole slightly smaller than the diameter of your lag screw. If you force a thick bolt directly into an old wooden stud without a pilot hole, you risk splitting the wood vertically inside the wall, which destroys the structural integrity of the stud and drastically reduces the anchor’s holding power.
Features That Actually Matter (And Those That Don’t)
Marketing departments love to invent fancy terms for simple hardware. Let me filter the noise for you:
Features That Matter:
-
Welded vs. Bolted D-Rings: If an anchor loop is welded completely shut, it’s virtually indestructible. If it’s just bent into a D-shape with a visible seam, heavy tension will eventually pry that seam open.
-
Neoprene Padding: On strap-based anchors, thick neoprene is crucial. It protects the band from the abrasive nylon webbing.
-
Powder Coating: On metal anchors, a powder-coated finish is far superior to standard paint. It resists chipping when metal carabiners clank against it, preventing rust.
Features That Are Pure Fluff:
-
“Aerospace Grade Aluminum” on Static Clips: For a sliding track, aluminum is great to reduce weight. But for a fixed wall clip, heavy steel is better, cheaper, and stronger.
-
“Proprietary Foam” on Door Wheels: Foam is foam. As long as it’s dense enough not to squish flat under pressure, you don’t need “space-age” polymers to hold a strap behind a door.
✨ Don’t Miss These Exclusive Deals!
🔍 Upgrade your functional training with these top-rated solutions. Click on any highlighted item to check current pricing and availability. Say goodbye to flimsy setups and hello to commercial-grade gains!
Conclusion
Building an effective home gym doesn’t require thousands of dollars of cast iron, but it does require intelligent hardware. A high-quality resistance band anchor transforms a floppy piece of latex into a precision cable machine, giving you the biomechanical tension needed to build real strength and rehabilitate injuries safely.
Whether you are a renter utilizing the zero-impact Undersun Door Anchor, or a homeowner drilling the massive Bob and Brad Wall Mounts into your garage studs, remember that the anchor is the foundation of your safety. Never compromise on installation, always respect the physics of variable resistance, and maintain your equipment to ensure years of smooth, effective workouts. Stop guessing with your door handles, and give your bands the hardware they deserve.
FAQs
❓ What is the best height to install a resistance band wall anchor?
✅ Ideally, install three clips: one at ankle height (for curls/kickbacks), one at chest height (for presses/rows), and one slightly above your head (for pulldowns/tricep extensions). If you only have one clip, place it at mid-chest height. …
❓ Can a resistance band anchor break my door?
✅ Yes, if used improperly. Pulling heavy tension on a hollow-core door or pulling against the door latch (rather than the door frame/hinges) can warp the door, break the latch, or pull the door off its hinges entirely. …
❓ How much weight can a resistance band wall anchor hold?
✅ High-quality steel wall anchors mounted securely into wooden wall studs with 2.5-inch lag bolts can typically hold between 300 to 800 pounds of force, which is more than enough for commercial elastic band training. …
❓ Are resistance band door anchors safe for renters?
✅ Yes. Neoprene and foam-wheeled door anchors require zero drilling and leave no permanent marks. Just ensure you place the anchor on the hinge-side of a solid-core door to prevent accidental slippage and structural stress. …
❓ Do I need a carabiner for my resistance band anchor?
✅ While not strictly required, using a smooth, climbing-grade aluminum carabiner between the band and the anchor greatly reduces friction, preventing micro-tears in the latex and significantly extending the lifespan of your bands. …
Recommended for You
- 7 Best Multi Position Door Anchor for Resistance Bands in 2026: Expert Guide
- Resistance band door anchor: 5 Best Heavy-Duty Picks for 2026 Workouts
- 5 Best Resistance Band Wall Anchor Systems for Home Gyms (2026)
Disclaimer: This article contains affiliate links. As an Amazon Associate, I earn from qualifying purchases. If you purchase products through these links, we may earn a small commission at no additional cost to you.
✨ Found this helpful? Share it with your friends! 💬🤗